Retrofitting the Weber DGAV 32/36 to Subaru Manifold
8, 10, 12mm combination spanner,
Paint scraper, thin wire, toothbrush, fine sand paper, pipe cleaners,
Thin flat blade screwdriver, average size
Throttle linkage from Hitachi carb.
Piece of flat metal 1" or 25mm wide x 3" or 80mm long
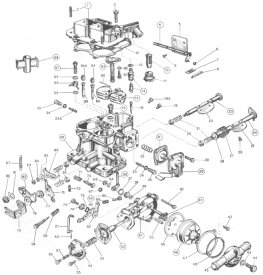
Fully strip the Weber carb and lay everything out in order. Place items on lengths of wire if you are unsure. submerse in kerosene or thinners and allow an hour to soak. Thoroughly clean all passageways and galleries with whatever is at hand. Ear buds and pipe cleaners are good here. Scrub the exterior of any deposits and blow dry with compressed air. If this is not available to you, rinse in thinners and allow to stand. An in depth approach to carb cleaning is to drill all the lead bungs and flush all passageways. Very time consuming indeed!
Take your throttle plates and clean them with polish to a high shine. Carefully clean all jets and tubes with degreaser and dry them. These can be polished in a little lemon juice for a few minutes do dissolve tarnish. Do not use files or metal objects to clean jets. It will ruin them. I use a toothbrush and a cream cleanser myself. Deburr the throttle spindles and remove rust and varnish. Put a light smear of grease on the shafts and reassemble the carburetor.
Use a quality rebuild kit when reassembling the carb. Do not use old diaphragms or worn components or your carb will not operate correctly. When ordering your kit, take the choke unloader (the diaphragm with the spigot on it inside the choke body) with you, there are two types available and the do not cross fit.
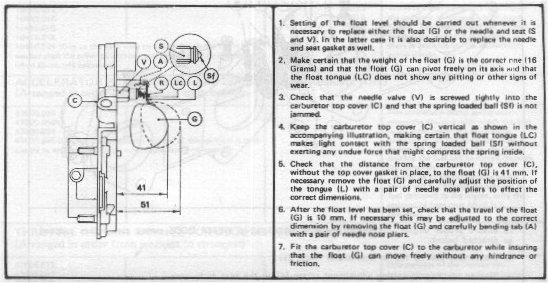
Put in your fuel bowl seat and attach the new needle. check that the fall of the float is within factory specs. Nitrofill floats are set at 35mm and a drop of 40~45mm.
With the carb upside down, open the throttle and insert the plates. Close the throttle and gently tighten the screws. Now open and close the throttle a few times to set the plates central. Nip up the screws. Next, wind the idle screw in 2 full turns after contact with the linkage. Then hold the carb so you are looking across the primary plate towards the transition ports. You should just be able to see the first transition port. If you can see the port or not at all, then we need to rectify that.
IF you can see the whole port.
You will need to drill a hole in the back of the throttle plate between center and edge of .5mm or .020" diameter.
IF you can't see the edge at all.
You will need to CAREFULLY file the leading edge of the throttle plate until the edge of the transition port is exposed. This will require you to remove the plate to do so.
When you are happy that the primary plate is adequate, look at the throttle stop on the secondary plate. You will see a small grub screw. Wind this up until it just makes contact with the stop. You don't want this opened by the screw but just so it cant fully close. A gap of .002" is recommended. If this is not done, the secondaries will jam shut.
Locate the A/F mixture screw, gently wind it in till it come to a stop. Sometimes this may feel like a tightening. Be careful! this little screw can stuff the entire carb! Do not over tighten this screw, you only want it to seat. When it has seated, wind it out 2 full turns. This is base setting.
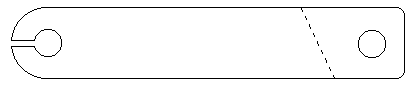
Moving on to the piece of metal, be it steel or aluminum, this will be the new cable holder. Drill a 8mm hole to accept the cable stay and cut to the hole a slot wide enough to allow the cable to pass through. drill a 8mm hole in the other end to bolt up to the manifold. You can go all out here and replicate the factory bracket but 1" higher. Take it from me though, the simple bracket works. Follow the diagram for the bracket and fold on the dotted line. Fold at about 60° then experiment from there until the slack is taken out of the cable.
Fit your adapter plate. There are many variants out there so be careful which one you choose. Some will bolt up to the EA82 but not the EA81 manifold, and some cause problems with the air-con compressor. Place your gaskets and bolt down your carb paying attention to correct torque for the nuts. Do not over tighten, firm is all that is needed. Over tightening warps the base of the carb and closes the holes up on the studs. Link up the throttle cable and adjust to spec. Make certain it is a straight pull.
Link up the fuel in hose to the right hand side pipe as you look at it from fuel bowl. Link up the return hose if fitted. This is the hose on the left. If it is not on your carb, block the return pipe at the fire wall. You may need a step down for the return hose, as it is 8mm at the carb but 6mm at the fire wall. Run a 8mm hose from the fuel bowl vent (if fitted) to the carbon canister. Connect up the 'hot' wire for the electric choke.
Link up the vacuum hose to the distributor, this is the port on the primary side of the carb. Run a hose from the right hand side tappet cover up to your choice of air cleaner. Run a hose from the left hand side tappet cover up to the PCV using one of the original connectors and add the carbon canister purge hose at this point. Remove all unused hoses and cap any active vacuum point.
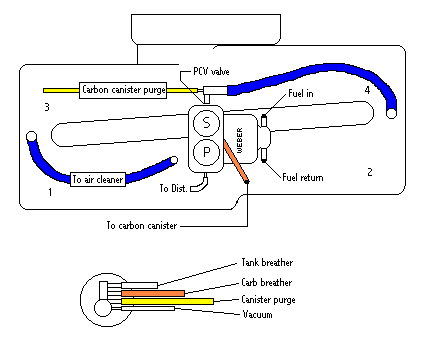
The only other vacuum hoses will be the brake booster, interior vacuum supply and idle up solenoid vacuum (if fitted). I removed the AB valve and capped the port, EGR was removed and capped and so was the reed valve on the exhaust. All the hoses and hard lines were removed and only the distributor vacuum hard line replaced (EA82).
Place on your air cleaner and start your car. Wait until the engine is warm. Slowly wind in the A/F mixture screw until the engine stumbles, this is max lean. Wind out the screw until this happens again, counting the turns. This is max rich. Put the screw between these points. Reset base idle and repeat the steps above. This is correct when the engine runs smooth and fastest.
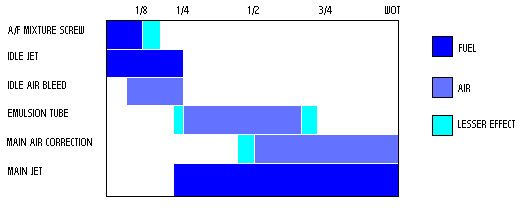
The chart above outlines the basic principal of the primary and secondary circuits. To understand a jetting problem you must understand which jet is responsible for each task.
Tuning of the Weber can be done with a flat blade screwdriver and your foot. To tune the primary circuit, set your A/F mix and then set your speed screw so that the engine is running at 2000RPM. Slowly turn the mixture screw out, if the engine runs faster the mixture is weak and you should go up a size in idle jet. Slowly turn the mixture screw in. If it runs faster, the mix is rich. Go down a size of idle jet. If you change a jet, you need to redo the A/F mix setting BEFORE repeating the procedure. Remember, this only affects the primary side, so only change the primary idle jet.
Once the idle circuit is set, take your Sube out on the road. Idle along the road with the clutch fully engaged. Tromp the pedal and see if it will accept WOT (wide open throttle) at idle, this gives you an idea on the main jet size. If it stalls, then there is a lean condition, if it makes a deep tone it is rich. This is a rough guide on which way you need to go.
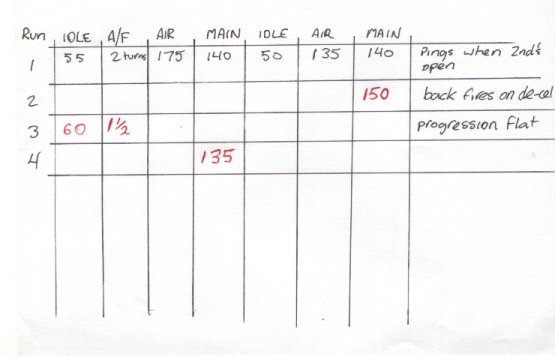
If everything is good, your Sube will rocket down the road. To tune the upper circuits, feel for the progression point to secondaries. Working on the primary circuit, open the throttle to the point of progression and hold. Doing this up a rise will help identify any problems. If your engine pings or runs flat, the circuit is lean. If it misses or makes a loud low tone it is rich. Changing the air correction jet will change the top end and changing the main will affect the entire circuit. Identify where the problem exists before changing a jet. Only make one change at a time and record your changes and settings on a piece of paper.
Something like this;
Periodically, test the base idle setting. Say every 7000Mi or 12000Kms. Do it as part of your service when you change oil. If you have to wind the A/F screw out to much this will indicate an air leak. With the stock fuel filters fitted on Subarus' there should be no need to clean the filter in the carburetor top cover. But if a fuel problem arises, don't overlook this small filter.
The one thing that these carbs will suffer is primary throttle shaft wear. This is easily checked by wiggling the primary shaft and feeling for movement. If this is done while the engine is running there will be a noticeable change in idle if it is worn. This will be fixed by bushing the the carb body.
If there are any suggestions of articles not covered here or you need specific help with a problem, drop me a line at mailto:camncath@powerup.com.au I will answer all e-mails.
A few sites of interest, all have spare parts and tuning information.
DISCLAIMER
Any change of original equipment from the manufacturer will void any and all warranties. In nearly every state, territory and country it is illegal to remove any part of the emission control system installed by the manufacturer no matter how superfluous it may be. This page is for information only! I strongly recommend that anyone contemplating doing this experiment check with there local authorities before undertaking such a venture. If it all goes pear shaped on you, don't blame me. No-one held a gun to your head and made you do it.
YOU HAVE BEEN WARNED